

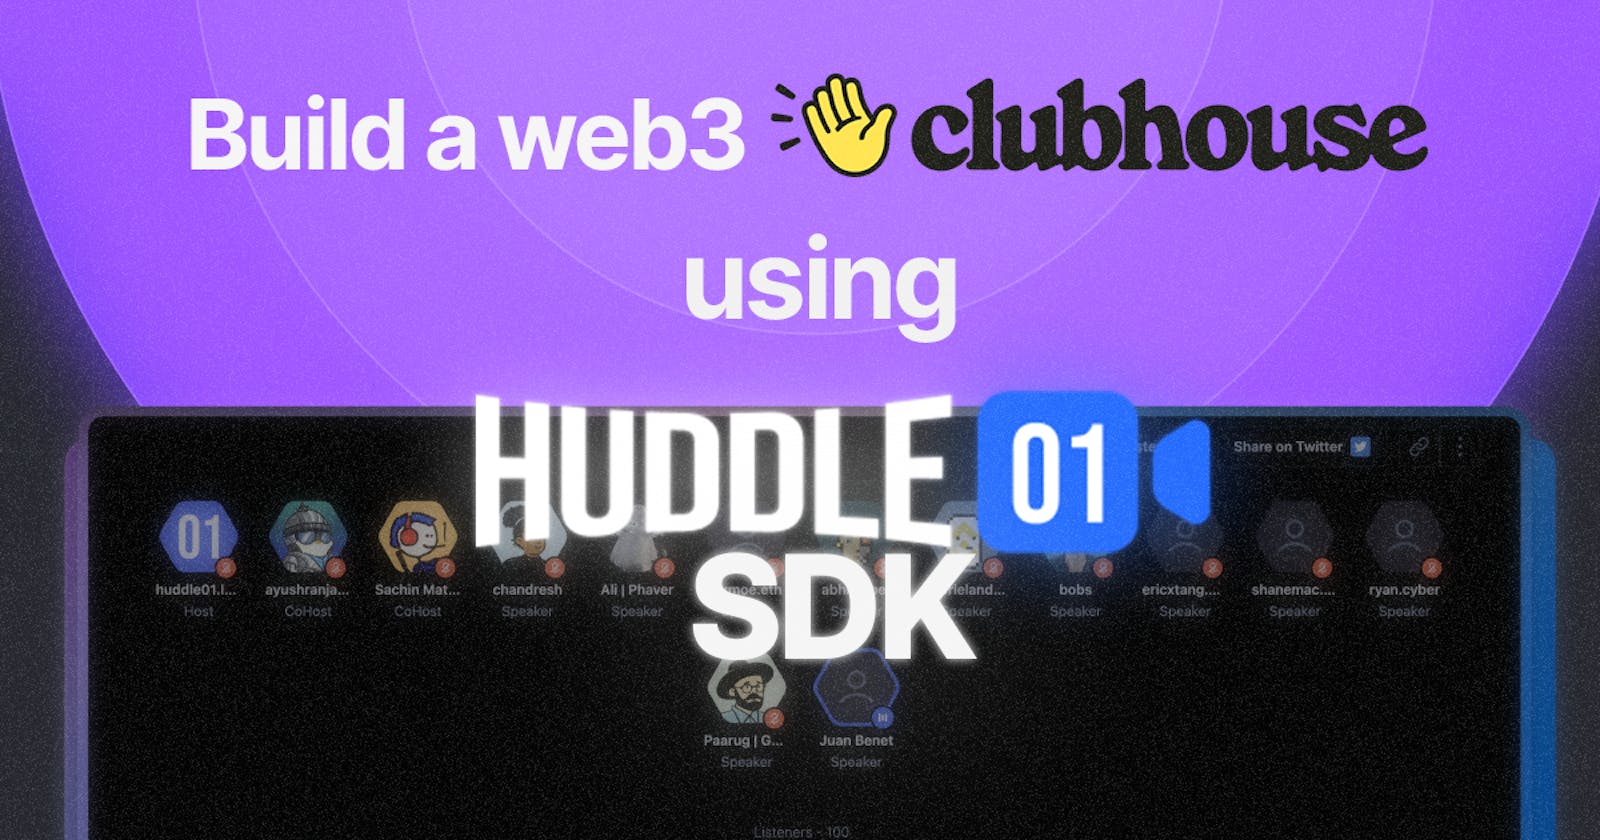
Build a web3 Clubhouse using the Huddle01 SDK
Huddle01's DevRel Engineer, Vraj Desai pens down a detailed tutorial on how to build your own Clubhouse like app using the Huddle01 Audio SDK.


Huddle01 recently had a fantastic launch party to introduce our brand-new audio spaces feature. Alongside that, we put together a step-by-step guide on how you can create your very own audio spaces using the Huddle01 SDK 🎙
After such a great launch I brainstormed ideas for what to build with this new feature, and one thought just wouldn't leave me:
Why not create a Web3 version of the sensational Clubhouse app, powered by Huddle01? 🤔
Remember how much hype Clubhouse created when it launched?
Well, buckle up, because we're going to build something equally awesome! 🎢
Let's Take a Sneak Peek! 👀
Here’s what we're going to build:
In this demo, we'll explore three key components:
Creating Spaces: We're going to make it super simple for anyone to create their audio space, that can be stored within a smart contract.
Landing Page: We'll build a landing page that displays live spaces and allows users to start their own spaces.
Audio Spaces: We'll leverage the Huddle01 audio spaces example app to enable users to start or join audio space 🎶
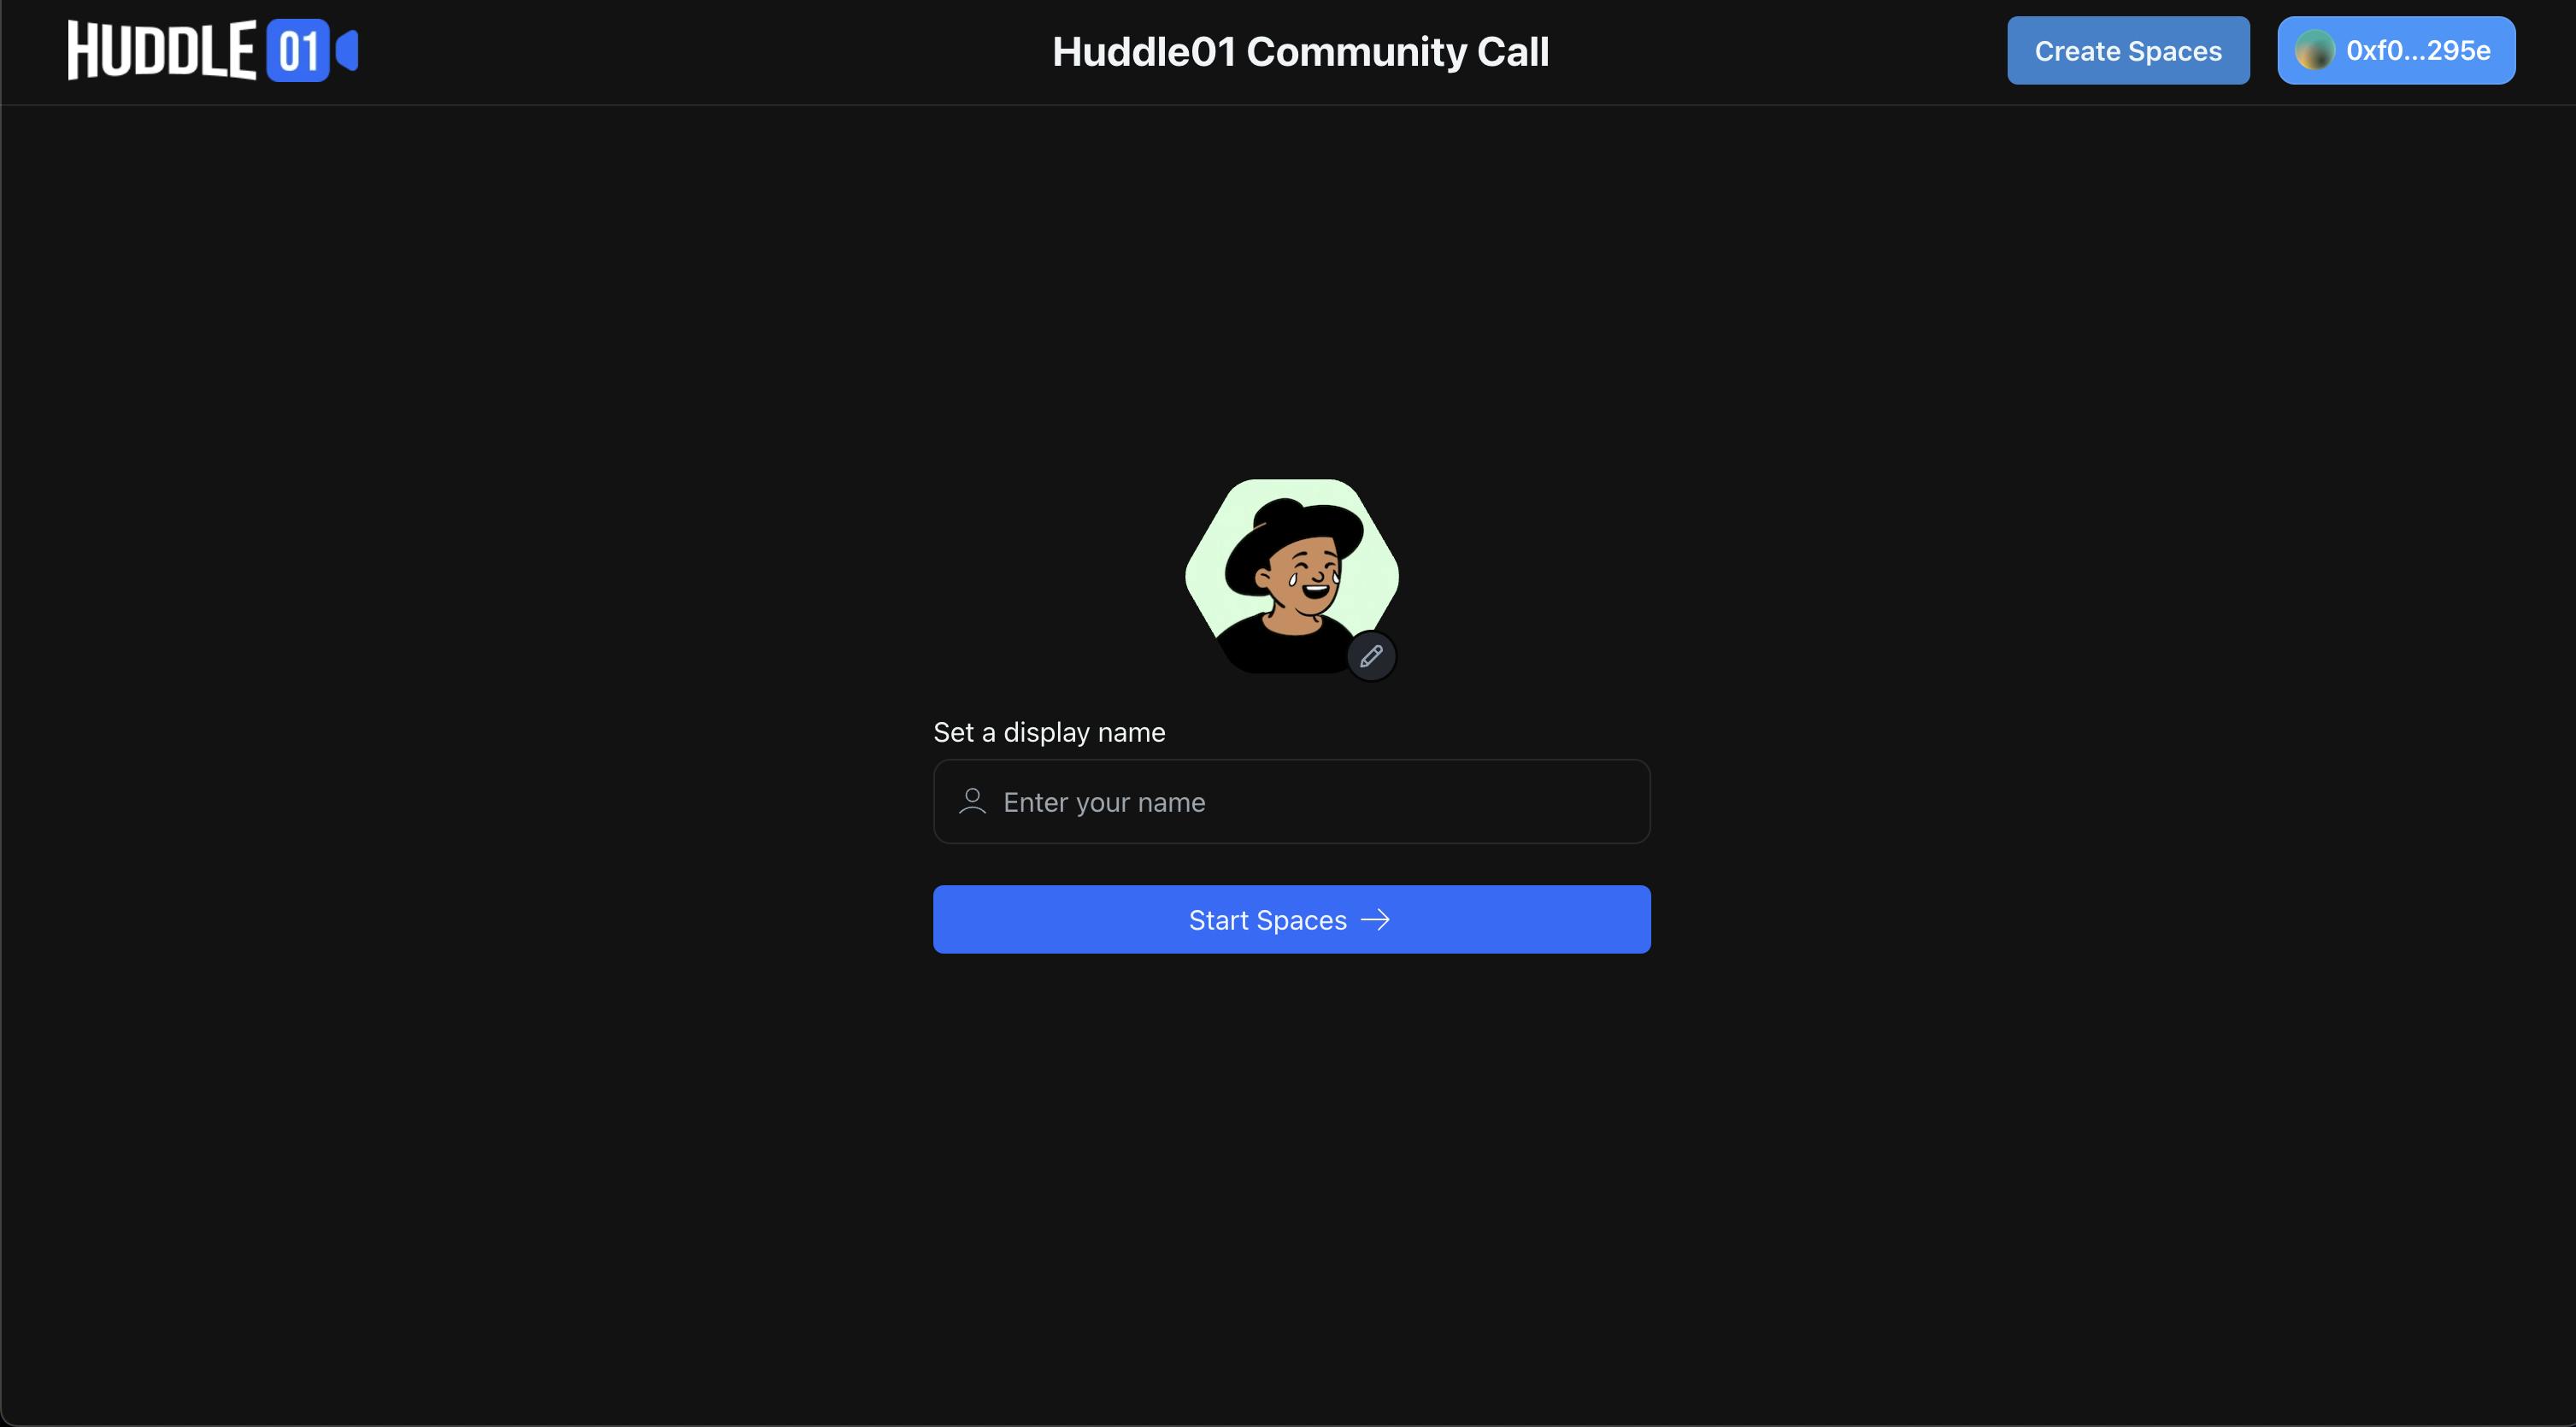
Getting Started: Creating a New Project
To kickstart our exciting project, we'll be using tools like Next.js, Tailwind, Chakra UI, and more. Here's how you can set up your development environment:
npx create-next-app
Select the options as shown below
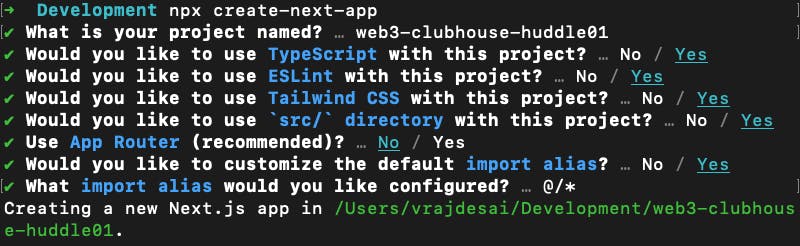
Just follow the prompts, it's as easy as ordering your favourite 🍕
Now, once you have created a Next JS project let’s install some required libraries which we are going to use throughout the project.
- Install Huddle01 SDK
pnpm add @huddle01/react
- Install libraries for Chakra UI
pnpm add @chakra-ui/react @emotion/react @emotion/styled framer-motion
- Install
wagmi,viem, andweb3modal
pnpm add @web3modal/ethereum @web3modal/react wagmi viem
After installing all required libraries let’s start building.
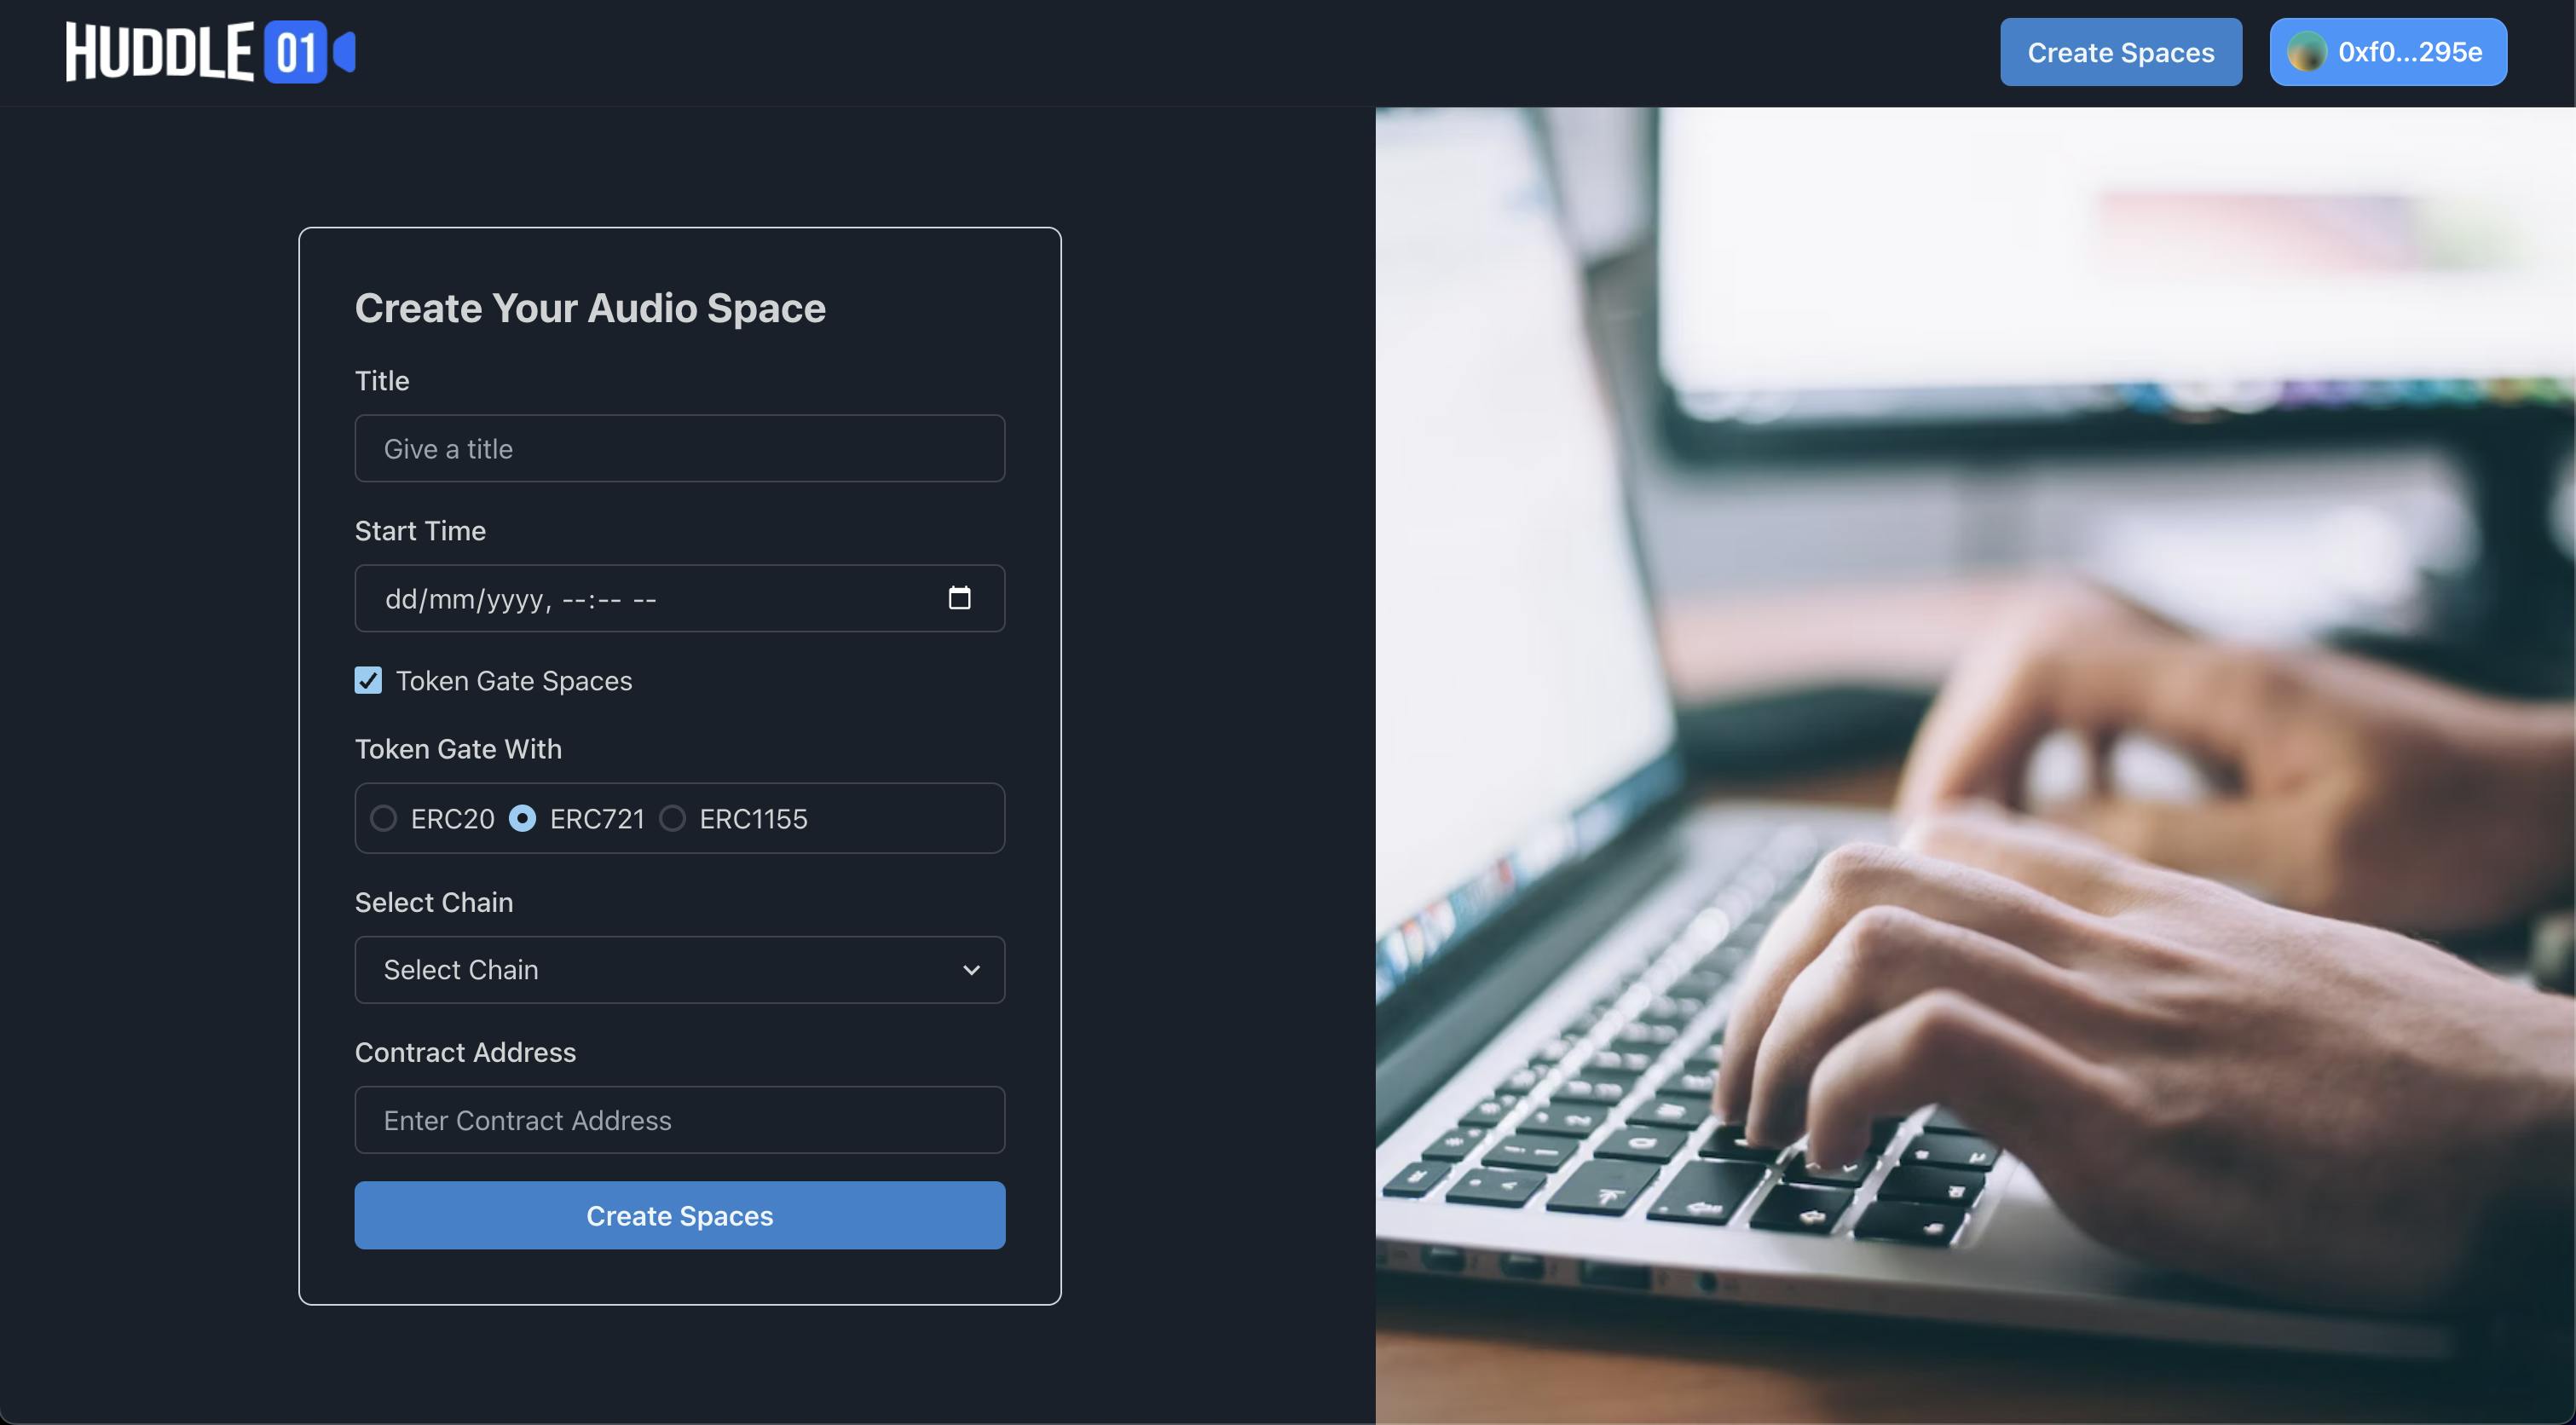
🛠 Building the Create Spaces Page
The first page we'll create is the Create Spaces page, where anyone can create an audio space! To make this happen, we need to build two things: a user interface (UI) and a smart contract that stores space information.
Creating a Smart Contract
We need to store the title, roomId, and startTime of the meeting in our smart contract. This will be a simple smart contract with a function that stores this information in a map created with a wallet address. The smart contract will store an array of these meetings. We also need a function that returns all user meetings by passing a wallet address.
You can use Remix which is an online IDE to test and deploy smart contracts. You are free to use other tools as well such as hardhat.
// SPDX-License-Identifier: MIT
pragma solidity ^0.8.18;

contract MeetingScheduler {
    struct Meeting {
        string title;
        string roomId;
        string time;
    }

    mapping(address => Meeting[]) private userMeetings;

    function scheduleMeeting(string memory _title, string memory _roomId, string memory _time) external {
        Meeting memory newMeeting = Meeting(_title, _roomId, _time);
        userMeetings[msg.sender].push(newMeeting);
    }

    function getUserMeetings(address _user) external view returns (Meeting[] memory) {
        return userMeetings[_user];
    }
}
Deploy the above code as meetings.sol to Polygon's Mumbai Testnet, or to any other network. Once deployed, copy the contract address and ABI as we will need it further to interact with the smart contract.
💻 To develop the UI for the Create Spaces page, we will use a form template from Chakra UI templates, instead of building it from scratch. Copy the code from the template and update it to fit our needs.
We need to call create-room API of Huddle01 which returns a roomId and then we need to store all these details inside our smart contract.
src/pages/api/createRoom.ts
// Next.js API route support: <https://nextjs.org/docs/api-routes/introduction>
import type { NextApiRequest, NextApiResponse } from "next";

interface RoomDetails {
  message: string;
  data?: {
    roomId: string;
  };
}

export default async function handler(
  req: NextApiRequest,
  res: NextApiResponse
) {
  const response = await fetch("<https://api.huddle01.com/api/v1/create-room>", {
    method: "POST",
    body: JSON.stringify({
      title: req.body.title,
      startTime: req.body.startTime,
      ...(req.body.isTokenGate && {
        tokenType: req.body.tokenType,
        chain: req.body.chain,
        contractAddress: [req.body.contractAddress],
        ...(req.body.tokenType === "ERC1155" && {
          conditionValue: req.body.tokenId,
        }),
      }),
    }),
    headers: {
      "Content-Type": "application/json",
      "x-api-key": process.env.API_KEY as string,
    },
  });
  const data: RoomDetails = await response.json();
  res.status(200).json({ roomId: data?.data?.roomId });
}
The above-mentioned code will create a Serverless API which calls Huddle01’s create-room API and returns roomId. It’s recommended to call this API from the server side as it helps to safeguard our API key from attackers.
Now, once we created a Serverless API let’s use it in our create.tsx page
const handleCreateSpaces = async () => {
    const response = await fetch("/api/createRoom", {
      method: "POST",
      body: JSON.stringify({
        title: name,
        startTime: new Date(time).toISOString(),
        isTokenGate: isTokenGate,
        tokenType: tokenType,
        contractAddress: contractAddress,
        chain: chain,
      }),
      headers: {
        "Content-Type": "application/json",
      },
    });
    const data = await response.json();
    console.log(data);
    if (data) {
      setRoomId(data.roomId);
    }
  };
Once, we got roomId it’s time to call our contract and send title, startTime and roomId. Before calling our contract let’s configure wagmi and web3modal
src/utils/wagmi.ts
import { configureChains, createConfig } from "wagmi";
import { polygonMumbai } from "wagmi/chains";
import { EthereumClient, w3mConnectors, w3mProvider } from '@web3modal/ethereum';

const supportedChains = [polygonMumbai];

const { publicClient } = configureChains(
    // @ts-ignore
    supportedChains,
    [w3mProvider({ projectId: "33e28c5d43009b3668cccf62984e6dbe" })],
);

export const config = createConfig({
    autoConnect: true,
    // @ts-ignore
    connectors: w3mConnectors({ projectId: "33e28c5d43009b3668cccf62984e6dbe", chains: supportedChains}),
    publicClient,
});
// @ts-ignore
export const ethereumClient = new EthereumClient(config, supportedChains)
src/utils/_app.tsx
import "@/styles/globals.css";
import type { AppProps } from "next/app";
import Navbar from "@/components/common/Navbar";
import HuddleProvider from "@/components/ClientComponents/HuddleProvider";
import { ChakraProvider, extendTheme } from "@chakra-ui/react";
import { Web3Modal } from "@web3modal/react";
import { WagmiConfig } from "wagmi";
import { config, ethereumClient } from "@/utils/wagmi";

export default function App({ Component, pageProps }: AppProps) {

  return (
    <HuddleProvider>
      <ChakraProvider>
        <WagmiConfig config={config}>
        <Navbar />
        <Component {...pageProps} />
        </WagmiConfig>
        <Web3Modal
        projectId={process.env.NEXT_PUBLIC_WC_PROJECT_ID as string}
        ethereumClient={ethereumClient}
      />
      </ChakraProvider>
    </HuddleProvider>
  );
}
You need to get Walletconnect’s project ID and save it inside the .env file. Now, let’s create a Navbar and add a connect button from web3modal.
src/components/common/Navbar.tsx
import React from "react";
import Image from "next/image";
import { Web3Button } from "@web3modal/react";

type NavbarProps = {};

const Navbar: React.FC<NavbarProps> = () => {
      {/* UI.. */}
        <Web3Button />
    {/* UI.. */}
  );
};
export default Navbar;
To call our contract we need its ABI.
src/utils/contractABI.ts
export const contractABI = [
  {
    inputs: [
      {
        internalType: "string",
        name: "_title",
        type: "string",
      },
      {
        internalType: "string",
        name: "_roomId",
        type: "string",
      },
      {
        internalType: "string",
        name: "_time",
        type: "string",
      },
    ],
    name: "scheduleMeeting",
    outputs: [],
    stateMutability: "nonpayable",
    type: "function",
  },
  {
    inputs: [
      {
        internalType: "address",
        name: "_user",
        type: "address",
      },
    ],
    name: "getUserMeetings",
    outputs: [
      {
        components: [
          {
            internalType: "string",
            name: "title",
            type: "string",
          },
          {
            internalType: "string",
            name: "roomId",
            type: "string",
          },
          {
            internalType: "string",
            name: "time",
            type: "string",
          },
        ],
        internalType: "struct MeetingScheduler.Meeting[]",
        name: "",
        type: "tuple[]",
      },
    ],
    stateMutability: "view",
    type: "function",
  },
];
src/utils/constants.ts
export const contractAddress = "YOUR_CONTRACT_ADDRESS"
Now, let’s finally call our contract’s method to store meeting details.
src/pages/create.tsx
import { useEffect, useState } from "react";
import { toast } from "react-hot-toast";
import { contractABI } from "@/utils/contractABI";
import { contractAddress as NFTContractAddress } from "@/utils/constants";
import { usePrepareContractWrite, useContractWrite } from "wagmi";
import { useRouter } from "next/router";

export default function SplitScreen() {
  const [name, setName] = useState("");
  const [time, setTime] = useState(new Date().toISOString());
  const [roomId, setRoomId] = useState("");
  const [isTokenGate, setIsTokenGate] = useState(false);
  const [contractAddress, setContractAddress] = useState("");
  const [tokenType, setTokenType] = useState("ERC721");
  const [chain, setChain] = useState("ETHEREUM");
  const { push } = useRouter();

  const { config } = usePrepareContractWrite({
    address: NFTContractAddress,
    abi: contractABI,
    functionName: "scheduleMeeting",
    args: [name, roomId, new Date(time).toISOString()],
  });

  const { write, status, data } = useContractWrite(config);

  useEffect(() => {
    if (status === "success") {
      console.log(data);
      toast.success("Space created successfully");
      push(`/`);
    }
  }, [status]);

    // Call this method on button click of Create Spaces
  const handleCreateSpaces = async () => {
    const response = await fetch("/api/createRoom", {
      method: "POST",
      body: JSON.stringify({
        title: name,
        startTime: new Date(time).toISOString(),
        isTokenGate: isTokenGate,
        tokenType: tokenType,
        contractAddress: contractAddress,
        chain: chain,
      }),
      headers: {
        "Content-Type": "application/json",
      },
    });
    const data = await response.json();
    console.log(data);
    if (data) {
      setRoomId(data.roomId);
    }
  };

  useEffect(() => {
    if (roomId && write) {
      write();
    }
  }, [roomId, write]);

  return (
    {/* UI */}
  );
}
Developing the Home page
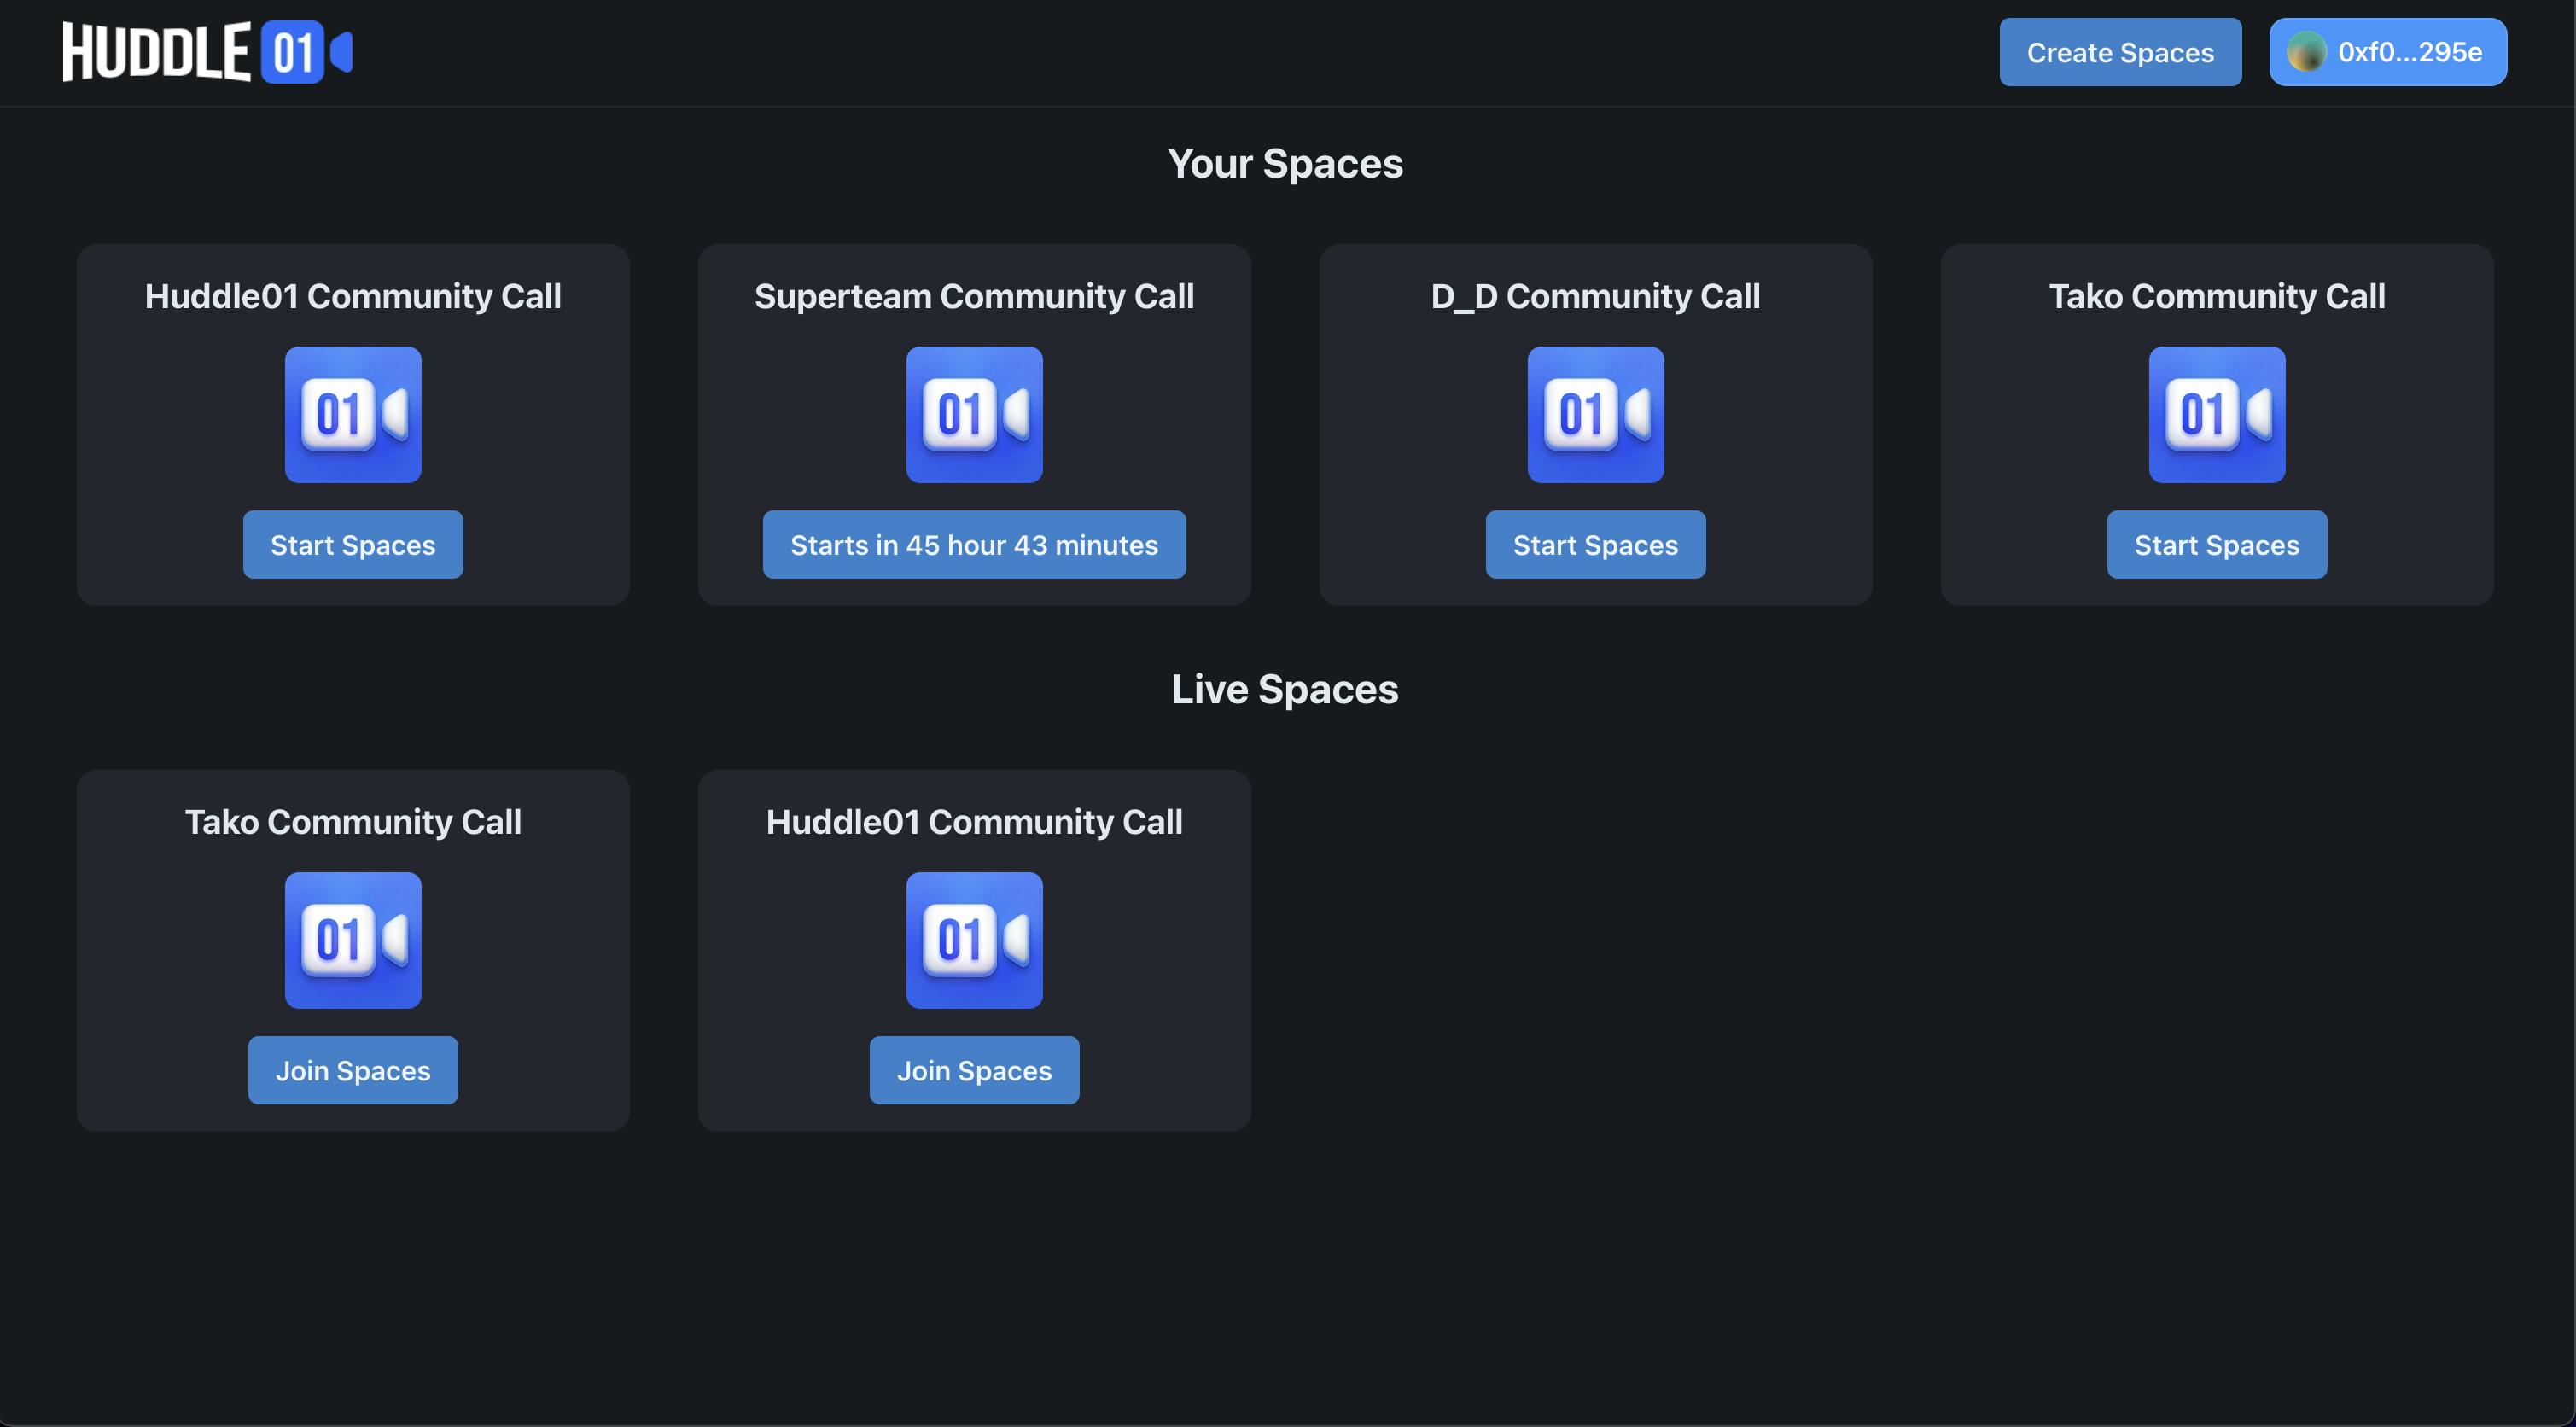
On our home page, we need to show two grids one for user’s created spaces and another for live spaces.
Fetching User-created Spaces
To retrieve spaces created by a specific user, we'll invoke the getUserMeetings method from our contract. This method returns a list of spaces associated with the user's address. Here's how you can implement it in your code:
const { address } = useAccount();

const { data: yourMeetings } = useContractRead({
  address: contractAddress,
  abi: contractABI,
  functionName: "getUserMeetings",
  args: [address],
});
Displaying Live Spaces
Live spaces are where the action happens in real-time, and we want to feature them prominently on our homepage. To accomplish this, we'll use the live-meetings API of Huddle01. We'll leverage the getServerSideProps function to interact with this API and retrieve live spaces dynamically.
export const getServerSideProps = async () => {
  const response = await fetch(
    "<https://api.huddle01.com/api/v1/live-meetings>",
    {
      method: "GET",
      headers: {
        "x-api-key": process.env.API_KEY as string,
      },
    }
  );
  const liveMeetings = await response.json();
  return {
    props: {
      liveMeetings,
    },
  };
};
Implementing Audio Spaces with Huddle01 SDK
In building this project, one of the essential components is the integration of audio spaces. We'll leverage the power of the Huddle01 SDK and adapt code from the Audio Spaces Sample App to seamlessly integrate audio spaces into our application.
Creating Join Lobby Functionality
Directory Structure
To implement the "Join Lobby" functionality, we'll create two specific files.
pages/[roomId]/index.tsx: This is the default route where users will be redirected when they click the "Start Spaces" or "Join Spaces" button.pages/[roomId]/lobby/index.tsx: In this route, we'll create the user interface for the lobby, where users can select their avatars and display names. When a user clicks "Start Spaces," we'll call thejoinRoom()method and redirect them to the/[roomId]route. Here, we'll also handle the logic to generate anaccessTokenfor token-gated rooms.
pages/[roomId]/index.tsx
const { isRoomJoined } = useRoom();

useEffect(() => {
    if (!isRoomJoined && query.roomId) {
      push(`/${query.roomId}/lobby`);
      return;
    }
  }, [isRoomJoined, query.roomId]);
In the above code, we'll first check whether the user has already joined the room or not using the isRoomJoined status obtained from the useRoom() hook. If the user is not joined and there's a valid roomId in the query, we'll redirect them to the /[roomId]/lobby route.
In /[roomId]/lobby route We will create a UI for the lobby where we ask the user to select its avatar and display name. Once, the user clicks on Start Spaces we will call joinRoom() method and redirect the user to /[roomId] . Here, we also have to handle a logic to generate accessToken for token gated rooms. So, for that, we will first install @huddle01/auth package and use getMessage and getAccessToken methods.
page/[roomId]/lobby/index.tsx
import Image from "next/image";
import React, { useEffect, useState } from "react";
import { useRouter } from "next/router";
import { getAccessToken, getMessage } from "@huddle01/auth";
import { useSignMessage, useAccount } from "wagmi";

// Hooks
import { useEventListener, useHuddle01, useLobby, useRoom } from "@huddle01/react/hooks";

const Lobby = () => {
  // Local States
  const [isOpen, setIsOpen] = useState<boolean>(false);
  const { address } = useAccount();

  // Global States from zustand
  const setAccessToken = useStore((state) => state.setAccessToken);
  const accessToken = useStore((state) => state.accessToken);

  // Sign Message Hook
  const { signMessage } = useSignMessage({
    onSuccess: async (message) => {
      const token = await getAccessToken(message, address as `0x${string}`);
      setAccessToken(token.accessToken);
    },
  });

  const { push, query } = useRouter();

  const { roomId: queryRoomId } = query;

  // Huddle Hooks
  const { joinRoom, isRoomJoined } = useRoom();
  const { initialize } = useHuddle01();
  const { isLobbyJoined, joinLobby, isLoading } = useLobby();
  const [roomId, setRoomId] = useState("");

  const getUserAccessToken = async () => {
    const msg = await getMessage(address as string);
    signMessage({ message: msg.message });
  };

  useEffect(() => {
    if (queryRoomId) {
      setRoomId(queryRoomId as string);
    } else {
      push("/");
    }
  }, [queryRoomId]);

  useEffect(() => {
    if (!isLobbyJoined && roomId) {
      initialize(process.env.NEXT_PUBLIC_PROJECT_ID ?? "");
      if (!accessToken) {
        getUserAccessToken();
      } else {
        joinLobby(roomId, accessToken);
      }
      return;
    }
  }, [isLobbyJoined, roomId]);

  useEffect(() => {
    if (accessToken && roomId) {
      joinLobby(roomId, accessToken);
    }
  }, [accessToken]);

    // Call on button click of Start Spaces
  const handleStartSpaces = () => {
    if (!isLobbyJoined) return;

    if (!userDisplayName.length) {
      toast.error("Display name is required!");
      return;
    } else {
      joinRoom();
    }
  };

  useEventListener("lobby:failed", () => {
    toast.error("Failed to join lobby");
  })

    // Once room is joined, redirect user to room
  useEffect(() => {
    if (isRoomJoined) {
      push(`/${roomId}`);
    }
  }, [isRoomJoined]);

  return (
        {/* UI for lobby */}
    )
};
export default Lobby;
Creating Functionality for Room
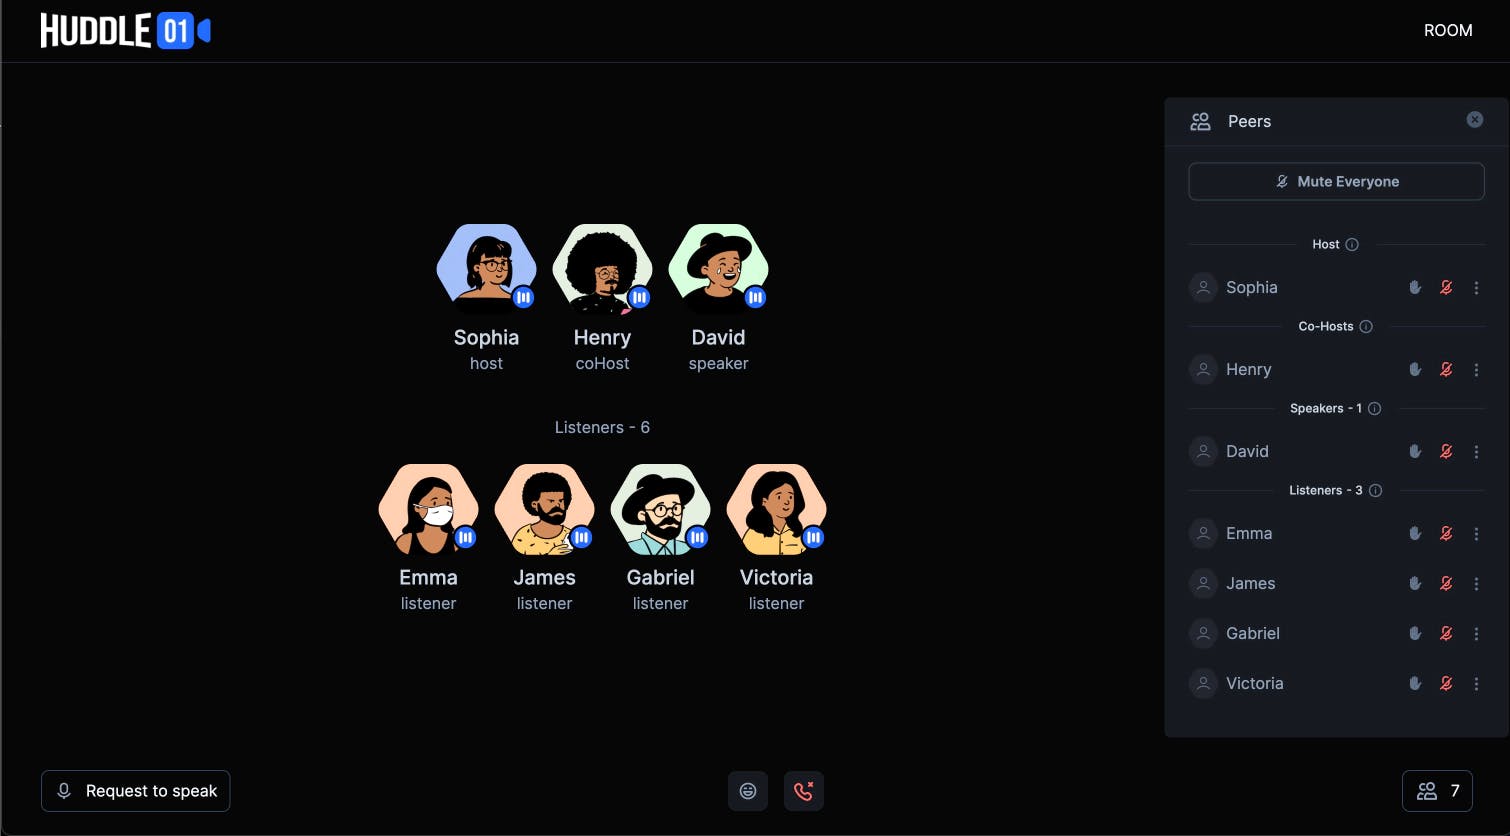
In the room, we need multiple components such as GridCardLayout, BottomBar, and Sidebar. We will break code into components according to its use. Let’s write code for each component.
Developing GridCard for each participant
import { useEventListener, useHuddle01 } from "@huddle01/react/hooks";
import React, { useEffect, useState } from "react";
import Image from "next/image";

type GridCardProps = {
  peerId: string;
  displayName: string;
  mic?: MediaStreamTrack | null;
  role: IRoleEnum;
  avatarUrl: string;
};

const GridCard: React.FC<GridCardProps> = ({
  peerId,
  role,
  displayName,
  mic,
  avatarUrl,
}) => {
  const [reaction, setReaction] = useState("");
  const [isHandRaised, setIsHandRaised] = useState(false);
  const isMyHandRaised = useStore((state) => state.isMyHandRaised);
  const myReaction = useStore((state) => state.myReaction);
  const { me } = useHuddle01();

    // Listenining data received event to get reaction and show it in UI
  useEventListener("room:data-received", (data) => {
    if (data.fromPeerId === peerId && data.payload["reaction"]) {
      setReaction(data.payload["reaction"]);
      setTimeout(() => {
        setReaction("");
      }, 5000);
    }

    if (
      data.fromPeerId === peerId &&
      (data.payload["raiseHand"] == true || data.payload["raiseHand"] == false)
    ) {
      setIsHandRaised(data.payload["raiseHand"]);
    }
  });

  useEffect(() => {
    if (peerId === me.meId) {
      setIsHandRaised(isMyHandRaised);
    }
  }, [isMyHandRaised]);

  useEffect(() => {
    if (myReaction && peerId === me.meId) {
      setReaction(myReaction);
      setTimeout(() => {
        setReaction("");
      }, 5000);
    }
  }, [myReaction]);

return (
    {/* UI ... */}
)
In the above code, we will get all the required details from props and use it in the UI to show that dynamically. Now let’s develop a GridLayout which uses GridCard
Developing GridLayout using GridCard
import { Peer } from "@/utils/types";
import GridCard from "./GridCard/GridCard";
import { useHuddle01, usePeers } from "@huddle01/react/hooks";
import { useEffect } from "react";
import Audio from "../common/Audio";

type GridLayoutProps = {};

const GridLayout: React.FC<GridLayoutProps> = () => {
  const Blacklist = ["peer", "listener"];

  const { peers } = usePeers();
  const { me } = useHuddle01();

  return (
    <div className="w-full h-full ml-10 flex items-center justify-center flex-col py-20">
      <div className="flex-wrap flex items-center justify-center gap-4 w-full">
        {/* Show Me peer in Speaker section if me peer role is host, coHost, or speaker */}
        {!Blacklist.includes(me.role) && (
          <GridCard
            displayName={me.displayName}
            peerId={me.meId}
            role={me.role}
            avatarUrl={me.avatarUrl}
          />
        )}
        {/* Show all peers which have host, coHost and speaker role */}
        {Object.values(peers)
          .filter((peer) => ["host", "coHost", "speaker"].includes(peer.role))
          .map(({ displayName, peerId, role, avatarUrl, mic }) => (
            <GridCard
              key={peerId}
              displayName={displayName}
              peerId={peerId}
              role={role}
              avatarUrl={avatarUrl}
              mic={mic}
            />
          ))}
      </div>
      <div className="mt-10">
        <div className="text-custom-6 text-base font-normal text-center mb-5">
          Listeners - {Object.values(peers).filter(({role}) => role === "listener").length + (me.role == "listener" ? 1 : 0)}
        </div>
        <div className="flex-wrap flex items-center justify-center gap-4 w-full">
          {/* Show Me peer in Listener section if me peer role is listener */}
          {Blacklist.includes(me.role) && (
            <GridCard
              displayName={me.displayName}
              peerId={me.meId}
              role={me.role}
              avatarUrl={me.avatarUrl}
            />
          )}
          {/* Show all peers which have listener role */}
          {Object.values(peers)
            .filter((peer) => Blacklist.includes(peer.role))
            .map(({ displayName, peerId, role, avatarUrl }, i) => (
              <GridCard
                key={peerId}
                displayName={displayName}
                peerId={peerId}
                role={role}
                avatarUrl={avatarUrl}
              />
            ))}
        </div>
      </div>
    </div>
  );
};
export default GridLayout;
Managing Roles in Audio Spaces
There are 4 roles in the audio space:
Host: By default, anyone who joins the room first will be assigned as a host. The host can manage the room and assign peers roles such as
coHost,speaker, orlistener.Co-Host: The co-host possesses almost full control over the room, similar to the host, except not being able to change a peer’s role to
coHost. Co-hosts can assign the roles of speaker or listener to other participants.Speaker: Speakers can actively participate and speak in the room.
Listener: Listeners can only listen in the room and have the ability to send reactions.
Now, once you have understood the roles in the room, you can use changePeerRole method from useAcl hook where you just need to pass the peerId and role to change the peer's role. Please make sure that you follow the role hierarchy as mentioned above while changing the peer's role.
import { useAcl } from "@huddle01/react/hooks";

const { changePeerRole, changeRoomControls } = useAcl();

// changePeerRole supports 4 roles: host, coHost, speaker and listener
const changeRole = (peerId, role) => {
  // Make sure that you call this method only when you are a host.
  changePeerRole(peerId, "host");
};

const muteEveryone = () => {
  changeRoomControls("muteEveryone", true);
};
Sending Reactions and Speaker Request
You can send reactions and raise hands in the room using sendData() method from useAppUtils hook. You can pass an emoji in data and send it to all peers in the room, and you can listen to it using room:data-received event. Similarly, you can send speaker requests to host using sendData() method and listen to it using room:data-received event.
import { useAppUtils, usePeers } from "@huddle01/react/app-utils";
import { useEventListener } from "@huddle01/react/hooks";

const { sendData } = useAppUtils();
const { peers } = usePeers();

useEventListener("room:data-received", (data) => {
  console.log(data);
});

const sendReaction = (emoji) => {
  // Here "*" represents all peers in the room
  sendData("*", {emoji: emoji });
};

const sendSpeakerRequest = () => {
  // Get the host peerId from peers object
  const peerIds = Object.values(peers).filter(({role}) => role === "host" || role === "coHost")
  .map(({peerId}) => peerId);
  // Send speaker request to host using the host peerIds
  sendData(peerIds, {speakerRequest: true });
};
Happy Hacking 🎉
As you reach the end of this article, I hope you're feeling inspired and equipped with the knowledge to build your version of Clubhouse. Remember, the world of Web3 and decentralized applications is filled with limitless possibilities and you can build a lot of cool stuff. Your creativity and innovation are the only boundaries!
If you're eager to dive deeper or want to explore the code mentioned in this tutorial, you can find the full sample app code on GitHub. Feel free to use it as a reference or a starting point for your projects. And say 👋 to us on Discord for any help.
Happy hacking, fellow developers. Stay curious, keep coding, and let's build the future together! 🚀